


You lift the phone to take a photo of something that will not wait — a child mid-laugh, a whiteboard before it gets wiped, a parking sign you need to remember — and the preview refuses to settle. It hunts in and out. It settles on the background. Or it simply produces a soft, hazy image that looks like it was shot through a steamed-up window.
The frustrating part of a blurry phone camera is that the cause is rarely obvious, and the possible explanations range from a fingerprint you can wipe away in two seconds to an optical image stabilisation module that has physically failed.
The good news is that a five-minute structured diagnostic separates them reliably. At Fone Doctors a meaningful share of the camera faults brought to us turn out to be a scratched lens cover — a cheap, quick, external replacement that does not touch the camera module at all. It is worth knowing that before you conclude your phone needs replacing.
What Actually Sits Behind That Small Circle
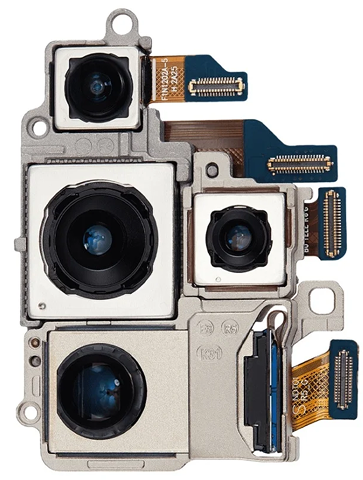
A phone camera is a stack of components, and each one fails differently.
| Component | What it does | Symptom when it fails |
|---|---|---|
| Lens cover | The outer sapphire or glass shield protecting everything beneath | Haze, milky images, heavy flare and starbursts in bright light |
| Lens elements | The plastic and glass optics that focus light onto the sensor | Permanent soft spots, distortion in one part of the frame |
| Autofocus motor | Moves the lens assembly to achieve focus | Focus hunting, inability to lock, sharp only at one fixed distance |
| OIS module | Magnetically counteracts hand shake | Visible shaking in preview, rattling or buzzing noise, blur in low light only |
| Image sensor | Converts light into the image | Coloured patches, dead pixels, lines, wildly wrong exposure |
| Camera flex cable | Carries data and power to the logic board | Camera app crashes, black screen, camera not detected at all |
The single most useful diagnostic insight is that each of these produces a different kind of blur. Learn to tell them apart and you have effectively diagnosed the phone.
The Five-Minute Diagnostic
Work through in order.
Step 1: Clean the lens properly
Obvious, routinely skipped, and genuinely the answer more often than anything else on this list. Skin oil forms a thin even film that scatters light and produces exactly the soft, hazy look people describe as a broken camera.
Use a microfibre cloth, not a shirt. Breathe on the lens rather than using cleaning sprays — solvents can degrade lens coatings over time.
Step 2: Take the case off
Thick cases, and particularly cases with a raised lip around the camera cutout, cause two problems: they cast a soft shadow into the edge of the frame, and they reflect the flash back into the lens, producing a washed-out haze in every flash photo. Magnetic cases and wallet attachments cause a separate problem covered in step five.
Step 3: Test both cameras and all lenses
Open the camera app and photograph the same well-lit subject with each option:
- Front camera
- Main rear camera at 1x
- Ultra-wide at 0.5x
- Telephoto at 2x, 3x or 5x if fitted
If only one lens is affected, the fault is in that specific module and the others are fine. That is genuinely good news — individual modules can be replaced without touching the rest.
If every camera is soft, suspect software, a display issue, or a logic board fault rather than the optics.
Step 4: Identify the type of blur
This is the diagnostic heart of the process.
| What you see | Most likely cause | Fix |
|---|---|---|
| Even haze across the whole frame, worse pointing at a light | Scratched or damaged lens cover | Lens cover replacement — cheapest camera repair |
| Preview visibly wobbles or vibrates | OIS module failure | Camera module replacement |
| Audible rattle or buzz when you shake the phone gently near the camera | OIS module has come loose internally | Camera module replacement |
| Focus hunts in and out and will not settle | Autofocus motor failure | Camera module replacement |
| Sharp at distance, soft close up, or the reverse | Autofocus motor partially failed | Camera module replacement |
| Blurry only in low light, fine in daylight | OIS failure, or expected behaviour on an older phone | Diagnostic required to distinguish |
| Coloured blotches, lines, or dead areas | Image sensor damage | Camera module replacement |
| Black screen or camera app crashes | Flex cable or connector fault | Flex or module replacement |
| Purple or green flare only in certain light | Lens coating damage or an aftermarket lens cover | Lens cover replacement |
Step 5: Check for magnetic interference
This is a modern cause that catches a lot of people out. OIS works using tiny magnets and coils. Strong external magnets — in magnetic car mounts, magnetic wallet cases, some phone rings and certain third-party accessories — can interfere with, and in sustained cases permanently damage, the OIS module.
If your camera developed shake or blur shortly after you started using a magnetic mount, remove it and test again. If the symptom persists after removal, the module has likely been damaged rather than merely disturbed.
Step 6: Rule out software
- Force close the camera app and reopen it.
- Restart the phone.
- Check for pending system updates — camera processing pipelines are frequently patched.
- Test in a different app. If the native camera is sharp but a social media app is soft, that is that app's compression, not your hardware. This accounts for a surprising number of complaints.
- Check if any lens filter or effect is enabled.
The Cause People Miss: A Cracked Lens Cover
That small circle of glass over each camera is a separate, replaceable component. It is not the lens itself and not the camera module — it is a protective cover, and it takes the impact so that the optics do not.
Crucially, a cracked lens cover often does not look dramatic. Hairline cracks and fine scratches are easy to miss, especially on a dark lens cover in indoor light. But optically the effect is severe: every scratch scatters incoming light, which lifts contrast, produces haze, and creates aggressive flare and starbursts around any bright source.
How to check yours in ten seconds
Hold the phone at an angle under a bright light and look across the lens surface rather than straight into it. Scratches and cracks catch the light and become obvious in a way they never are viewed head-on.
Then take a photo pointing towards a window or a lamp. A damaged lens cover produces heavy veiling haze and starburst artefacts that a healthy one does not.
The reason this matters commercially: a lens cover replacement is an external repair. It does not require the camera module to be replaced, it is one of the cheapest repairs on the price list, and it is completed in around 30 minutes. A great many people replace an entire phone over a symptom that a lens cover would have fixed.
What A Camera Repair Involves
Where the module itself has failed, the repair is more delicate than most.
- Free diagnostic. Both cameras and every lens tested against reference targets at multiple distances, plus a low-light test to check OIS behaviour specifically.
- Lens cover assessment first. Because it is external and cheap, this is always ruled in or out before recommending module replacement. We are not going to sell you a module when a cover would do.
- Controlled disassembly. Rear glass or display separated under controlled heat depending on the model, battery isolated first.
- Module replacement. The camera module is unseated from its connector and replaced with a specification-matched unit. Alignment matters — a module seated even fractionally off produces soft corners.
- Calibration. On models that pair camera modules to the logic board, calibration data is written so that features like Portrait mode, Night mode and the LiDAR-assisted focus continue to work correctly.
- Testing across the range. Focus at close, medium and infinity distances, OIS under deliberate shake, flash consistency, and video stabilisation.
- Reseal. Fresh adhesive and gasket, because the camera opening is a primary water ingress point.
Our camera repair in London covers lens cover replacement, full module replacement and flex cable repair, with free diagnostics, fixed pricing before work begins, and a twelve-month warranty.
When To Stop Troubleshooting
Bring the device in rather than continuing if:
- You can hear rattling from the camera area. That is a physically detached component moving inside the module, and continued use lets it damage neighbouring parts.
- The camera stopped working entirely after a drop.
- There is visible moisture, fogging or condensation behind the lens cover. That indicates a breached seal, and the corrosion clock is already running.
- The camera app crashes the phone or causes it to restart.
- There is any discolouration or bleeding visible behind the lens.
- Photos show coloured patches or lines that appear in every shot.
Condensation deserves particular attention. Moisture behind a lens cover means the water seal at the camera opening has failed, and that same opening is a direct route to the logic board. It needs looking at promptly rather than waiting to see what happens.
If you are unsure which category you are in, bring it into our London clinics for a free diagnostic. Testing against reference targets takes about ten minutes and tells you definitively whether you are looking at a lens cover, a module, or nothing at all.
Keeping Your Camera Sharp
- Clean the lens weekly with a microfibre cloth. It is the single highest-value habit here.
- Use a case with a raised camera lip. Nearly all camera lens damage happens from the phone being placed face-up on a hard surface.
- Add a lens protector if you carry the phone with keys or coins. They cost very little and take the scratches instead of the sapphire.
- Avoid magnetic mounts and magnetic wallets if your phone has OIS, or choose accessories specifically designed to be OIS-safe.
- Do not leave the phone in direct sun with the camera pointed at it. Concentrated light can damage the sensor over time.
- Keep it out of pockets with sand and grit — beach days are responsible for a striking number of scratched lens covers.
Related repair guides
Camera glass cracks often arrive with a smashed display. If the screen is damaged too, read cracked phone screen repair in London.
Key Takeaways
- Different faults produce distinctly different blur. Identifying the type of blur is most of the diagnosis.
- Clean the lens and remove the case before assuming anything is broken.
- Test each lens individually. A fault confined to one lens means the others are healthy and only that module needs work.
- A scratched lens cover is the most commonly missed cause and the cheapest fix. Inspect it at an angle under bright light.
- Rattling or visible preview shake means OIS failure. Get it seen before the loose module damages anything else.
- Magnetic mounts and wallets can permanently damage OIS. Choose OIS-safe accessories.
Frequently asked questions
The most common causes in order are a dirty lens, a scratched or cracked lens cover, an autofocus motor fault, and OIS failure. Clean the lens and remove the case first, then check the lens cover at an angle under bright light. If the preview visibly shakes or rattles, the OIS module has failed.
Share with your community
Get in touch
Questions about this repair? Send a message or book a slot at a London clinic.